Sunday, August 19, 2012

Romania - Sibiu, Artmania 2012

The sixth edition of Artmania Festival took place in Sibiu, between 06-August and 12-August 2012. The festival began as usual with artistic acts, as: live paintings, visits at museums and galleries, photography, Anim'est, astronomical observations, concerts, aso, organized at the Sibiu very well know locations as: Baroque Garden, Brukenthal Palace, Small and Large Squares.
Unfortunately, I was present only on the date of 11-August, at the concerts and I was able to shoot the next photos:


Next, images:

*

ABIGAIL, ROMANIA - I was very impressed of this band, as I seen them before @ Lake Of Tears Concert at Arenele Romane Bucharest. I was lucky to re-hear their songs, namely "Biterness - Tears", "Sonnet", "Desire" and "Sweet Cruelty"

 Abigail

 Abigail

 Abigail

 Abigail

 Abigail

Here is "Sonet" (taken from Youtube), as they played at Sibiu: Abigail - Sonet

*

POETS OF THE FALL, FINLAND - this was not was I expected, the band is formed of showmen playing music for the girls (sorry, it's only my opinion),
but, still, I was able to appreciate their best song,
namely "Carnival of Rust".
 Poets of the Fall

  Poets of the Fall

  Poets of the Fall

  Poets of the Fall

  Poets of the Fall
 
*

Next, DELAIN, Holland, entered the scene. I was quite curious about te band, as they are connected with known bands as WITHIN TEMPTATIONS and EPICA, but, haven't really really impressed me...

Delain

 Delain

 Delain

 Delain

 Delain

*

EDGUY from Germany followed. As I haven't listened him before, I expected a mediocre show, but I have to admit thet the guy impressed me - this guy really ROCKS !!
 Edguy

 Edguy

 Edguy

 Edguy

 Edguy

*

The head of the day, MY DYING BRIDE, England - was for the 3rd time to Sibiu and they doomed the audience as always...

 My Dying Bride

 My Dying Bride

 My Dying Bride

My Dying Bride

 *

Tuesday, August 7, 2012

Hydroponics - Simple dripping system

1.1 Materials and Costs
1.2 Building the system
1.3 Sowing and Propagation stage
1.4 Grow stage
 *

This is a practical implementation of a hydroponic system.
Our system will be a simple one, maybe not the simplest one, but one that will ensure the most important aspects of hydroponics.
The system is composed of 2 subsystems:
a) propagation system (see "1.3 Sowing and Propagation stage");
b) grow and blooming system (see "1.2 Building the system") - as we said, our system tries to implement kind of a dripping hydroponics method;

1.1 Materials and Costs
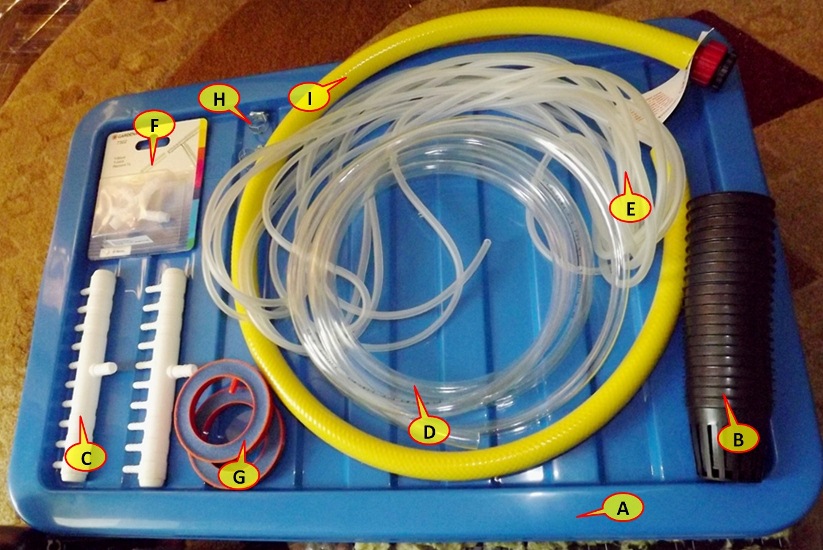
Some of them are presented in the next images:

 A to I Components

(A) to (I) hydroponic components listed:
A = from hypermarket - reservoir or tank, 60 x 40 x 18 (L x l x h) = 43L; Cost = 8EUR
B = from hydroponics shop - 20x Net Pots, 2 inches (5 cm); Cost = 2.5EUR
C = from aquarium shop - Manifold, 1 input (8mm) and 10 outputs (4mm); Cost = 2EUR; second manifold is not necessary;
D = from hypermarket - Hose - 8mm, 3m; Cost = 1EUR
E = from hypermarket - Hose - 4mm, 10m; Cost = 2.5EUR;
F = from aquarium shop - 2x "T" Converter, 8mm outside, 4mm inside; Cost = 2EUR
G = from aquarium shop - 2x aquarium stone; Cost = 4EUR;
H = from hypermarket - 2x necklace bracket; Cost = 0.5EUR; these are used for hoses and are optional;
I = from hypermarket - drain hose - 16mm, 1m; Cost = 2EUR; this is used for overall tank drain and is optional;


* 


J to Q Components

(J) to (Q) hydroponic components listed:
J = from aquarium shop - small water pump; flow = 400 L/h; max jet height = 0.7m; power = 5W; model = Hailea HX-1500; Cost = 9EUR
K = from aquarium shop - aquarium air pump; flow = 3.2 L/min; pressure = 0.01mpa; power = 2W; model = Hailea ACO-9601; Cost = 10EUR
L = from hydroponics shop - 80x GroDAN rock wool, 2.5cm; Cost = 5EUR
M = from hydroponics shop - 2x "White Boston" lettuce seeds; Cost = 0.7EUR
N = from hydroponics shop - 1x "Lollo Rosa" lettuce seeds; Cost = 1.2EUR
O = from hydroponics shop - Hydroton, 10L bag; Cost = 7EUR
P = from hydroponics shop - Growth Technology - "Ionic Hydro Grow" nutrient, 1L; Cost = 7EUR
Q = from hydroponics shop - Aptus - Regulator (100ml) and Plant Care (100ml); Cost = 3EUR

There are other components that appear in later images:
R = Bison - Sanitary Silicone; Cost=3EUR
S = small propagation tank; Cost = 0 (any small tank);

You will also need: electrical drill machine, electric saw, duct tape.

Total Cost = 70.5EUR

Note: we will use further in the article the notations, from A to S, conform to their description above.

1.2 Building the system
Ensure you have the materials above. Of course, the quantities may vary, for example you don't need 10L of hydroton (1L is enough), and you may also get rid of optional components.
First, some tests are necessary - the ones regarding the water and air pumps - this to assure they work and they provide the necessary flows, like in the images below:

 
Connection between water pump and manifold
(connect C - D - J)


 Water Pump Test without 4mm hoses connected on manifold outputs
(test C - D - J)

Water Pump Test with 4mm hoses connected on manifold outputs
(test C - D - J - E)


Air Pump Test with aquarium stones connected on 4mm hose
(test G - E - F - E - K)


Now, that we ensured these subsystems are working, we may continue to the next steps.
We'll continue with drilling the holes for the net pots on the water tank tray:

Establishing locations for the net pots (B) holes in the tray (A)

Note: make sure the net pots are located on the same height of the tray.

Setting the diameter for the drilling machine circular saw

Note: make sure the holes match the inner diameter of the net pots.

Next, we'll drill the location for the manifold with a linear electric saw:

Marking the manifold (C) location
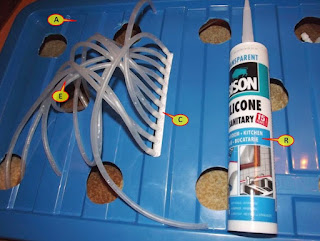

Fixing the manifold (C) with sanitary silicone (R)

 As my water tank was transparent, I have to darken it with some duct tape; this is required, as other unwanted plants (algae like) may develop in the water tank.

Darkening the bottom of the water tank


The final built system will look like:


Final hydroponic system

1.3 Sowing and Propagation Stage
I took an ordinary small transparent tank (S) for the propagation of seeds; I chosen to be transparent because I'm sowing lettuces, but be aware that other plants may require a dark propagation medium.
I also put the seeds in the small holes of the rock wool pieces. Thus, on one row I have "White Boston" seeds and on the other I have "Lollo Rosa":


Put seeds (M and N) on the rock wool (L) and placed in propagation tank (S)

Starting from the 3rd day, I put some Ionic Hydro Grow nutrient (P), according with Ionic Scheduler:

Ionic Hydro Grow (P), its scheduler and a syringe


Ionic Hydro Grow scheduler

After 4 days, they looked like:

Seedlings after 4 days

Then, after 7 days, they looked like:

Seedlings after 7 days

After 10 days, which was the time I decided to move the seedlings to the hydroponic system, they looked like:

Seedlings after 10 days


Note: usually the plants should be moved from the propagation system (S) to the Hydroponic system when the second level of leaves appear; this happens usually at 7-8 days after sowing.

1.4 Grow stage
To move the plants to the hydroponic system, I connected the water pump (J) inside the tank (A), then I connected the air pump (K) and the aquarium stones (G) to the tank, then put the net pots (B).
On the bottom of the net pots (B) I put a little hydroton balls (O), just to cover the bottom of the net pots; then I took the rock wool pieces (L) with plants and put inside the net pots over that hydroton; then I filled up the net pots (B) with hydroton (O) beside the rock wool pieces (L).
I started to fill the tank with water - the usable tank volume, until the water reaches the base of net pots, is about 30 liters (from 43L), but I only put 15 liters of water, then mixed with about 80ml nutrient solution (P).

It resulted the system in the image:

Hydroponic system


Closer look on the net pots.


Note: make sure that the manifold output hoses (E) water the rock wool pieces (L).

I will put further images with the system.

*

(: New pics :)
(... sorry for the delay, the harvesting was about a half of year ago ...)

 (about 7 days after put to Hydroponic system)

 (approx 6-8 days after put to Hydroponic system,
if I remember correctly...)

  (approx 6-8 days after put to Hydroponic system,
if I remember correctly...)

  (approx 14-16 days after put to Hydroponic system,
if I remember correctly...)

  (approx 14-16 days after put to Hydroponic system,
if I remember correctly...)

  (approx 14-16 days after put to Hydroponic system,
if I remember correctly...)

  (approx 25-28 days after put to Hydroponic system,
if I remember correctly...)

 (approx 25-28 days after put to Hydroponic system,
if I remember correctly...)

 *

Unfortunately for the plants, at about 30 days after I moved them in the Hydroponic system,
I had to leave the town (holiday time), and when returned, the harvesting time passed for about 5 days, so many of lettuces became thirsty, as they remained in a horible July sun and without sufficient water... so...
I could harvest only a half of the crop.

*
As a conclusion: the system was good enough, but you have to take care to check the water level in the tank, also to check the nutrients level - ie. a PH-meter would be good.

*


Monday, August 6, 2012

Hydroponics - Generalities

1.1 Definition
1.2 Growth considerations
1.3 Hydroponic methods
1.4 Hydroponics medium

*
 Hydroponics System
 
*
 
1.1 Definition
As wiki says, "Hydroponics is a subset of hydroculture and is a method of growing plants using mineral nutrient solutions, in water, without soil. Terrestrial plants may be grown with their roots in the mineral nutrient solution only or in an inert medium, such as perlite, gravel, mineral wool, expanded clay or coconut husk". The soil itself is not essential to plant growth.
In other words, main advantages of hydroponics are:
a) no soil required for growth - plant roots must reach water, air and nutrients;
b) water and nutrients recirculation - saves water and nutrients (which is optional);

1.2 Growth considerations
Some aspects when starting a plant growth should be known:
1.2.1 Growth stages:
a) propagation - refers to planting seeds (sowing), cloning plants; it is the period till the plants forms roots, until they are ready to grow on their own; propagation requires a special medium and it is done separated from the growth medium; seeds and clones are usually kept in a mineral wool medium, they require a non aerated, warm medium and humidity to force growing of roots; seedlings and clones should be only moist with water and nutrients and not excessively watered; the propagation period takes about 1 week (7 days); some seeds (if specified) require a dark medium.
b) grow - this is the period till the propagation and until the blooming period (where the plants starts flowering) - it is determined by the period when plants develop leaves; for the grow period, the plants should be moved from the initial propagation medium to their final destination that will ensure both grow and blooming stages; water, illumination, ventilation and nutrients is important, as in this period plants develops leaves and they are suitable for most growing; the grow period depends on the plants we seed; some plants require more weeks in this period.
c) bloom - the period when the plants start flowering; it is only valid for the plants that develop flowers; the medium conditions are the same as for the grow period, with the exception that the blooming period requires some extra special nutrients to ensure and boost the blooming; the blooming period depends on the plants we seed; some plants require more weeks in this period; this is the final stage for decorative and ornamental plants.
d) harvesting - this is valid for the vegetative plants (the ones that develop usually only leaves) and not for decorative and ornamental plants (the ones that develop flowers) - this is the final stage for our growth.
1.2.2 Illumination, aeration, ventilation, humidity, nutrients and parasites:
a) illumination - in propagation stage, illumination is required 12 hours per day (that if not specified that seeds must grow in a dark medium; at grow and blooming stages, illumination is required 16 hours per day;
b) aeration - is required in grow and blooming stages - the roots should be aerated;
c) ventilation - is required in grow and blooming stages - the leaves and flowers should be ventilated;
d) humidity - is important in all the stages - it is usually obtained by water vapors under a warm medium;
e) nutrients - are not especially required for seeds in the propagation stage, but is important for all stages after the plant develop roots; as the nutrients are mixed with water, the final solution should be carefully observed by measuring the pH; pH measuring is done with the help of pH testers, the limits should be between 5.7 and 6.2 and the regulation is done with the help of pH down (alkaline solution) and pH up (acid solution); usually, a general formula for the nutrients is NPK=795 percents, where N=nitrate, P=phosphorous, K=potasium); beside NPK, the nutrient formula may contain: copper, manganese, bohr, zinc, aso.
f) parasites - this also refer to infections - as much as possible, the hydroponic system should be protected of plant parasites and infections; the plant roots should not be exposed to illumination (as illumination ensures the growth of water algae); however, there exist special solutions to protect plants.

1.3 Hydroponic methods
There are several methods for hydroponics implementation, the main are presented below:
1.3.1 Static or passive irrigation - plant roots are kept directly in a water medium; the main disadvantage is that roots are not oxygenated, so, a complementary aeration solution is required;
1.3.2 DIY ("do it yourself") - the system is mounted into the light, usually beside windows and consists in continuous tanks recirculation - the upper tank waters the bottom tank, aso;


 Variant of DYI System

1.3.2 Continuous flow, also known as NFT (nutrient film technique) - water and nutrients is recirculated via tubes, in which plant roots reside; the advantage is water and nutrients recirculation, also the roots are aerated because of the upper part of tubes that are not watered;
 NFT System

1.3.3 Ebb, flow and drain - the plants resides on a tray above a water and nutrients reservoir or tank; at regular times, the tray (and subsequently the plants) is filled with water and nutrients which is then drained back in the tank;

 EBB & Flo System
 
1.3.4 Dripping - this is kind of EBB, flow and drain with the difference that water and nutrients are passed to roots via thin capillary tubes, the roots are watered and the water excess is drained back in the tank;

Dripping Aystem

Of course, there are other hydroponic methods and also alternatives to hydroponics: aeroponics and aquaponics.
Note: the system presented at "3. Building the hydroponic system" is kind of a dripping hydroponics method.

1.4 Hydroponics medium
The medium on which plant will grow consists of an alternative to soil medium:
1.4.1 coco, or coir - used in grow and blooming stages, coco is a natural growing medium; coco is obtained from the outmost fibers of coconuts; it is probably the best hydroponic growth medium;
1.4.2 clay balls - also called hydroton - is an alternative to soil; the clay is cooked at high temperature which causes clay to expand and become porous, forming balls; the balls will be inert, pH neutral and will not contain any nutrient value; it is used in grow and blooming stages;
1.4.3 rock wool - is a mineral wool, an artificial alternative to coir; it consists of fiber glass that maintains water and nutrients; it is used especially in propagation stage, but it may be used also in the grow and blooming stages; the disadvantage is that glass fiber may be harmful to roots;
1.4.4 perlite, pumice, vermiculite - volcanic rock, used as alternative to clay balls;

*