1.2 Building the system
1.3 Sowing and Propagation stage
1.4 Grow stage
*
This is a practical implementation of a hydroponic system.
Our system will be a simple one, maybe not the simplest one, but one that will ensure the most important aspects of hydroponics.
The system is composed of 2 subsystems:
a) propagation system (see "1.3 Sowing and Propagation stage");
b) grow and blooming system (see "1.2 Building the system") - as we said, our system tries to implement kind of a dripping hydroponics method;
1.1 Materials and Costs
Some of them are presented in the next images:
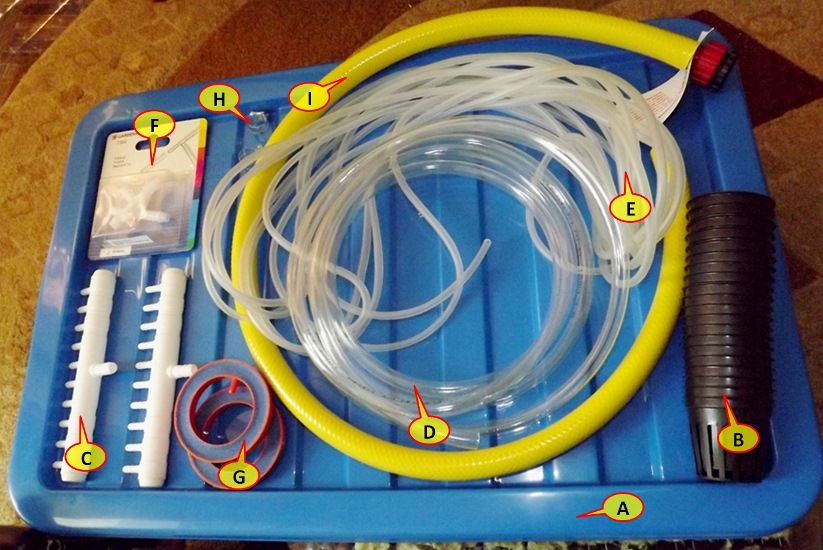
A to I Components
(A) to (I) hydroponic components listed:
A = from hypermarket - reservoir or tank, 60 x 40 x 18 (L x l x h) = 43L; Cost = 8EUR
B = from hydroponics shop - 20x Net Pots, 2 inches (5 cm); Cost = 2.5EUR
C = from aquarium shop - Manifold, 1 input (8mm) and 10 outputs (4mm); Cost = 2EUR; second manifold is not necessary;
D = from hypermarket - Hose - 8mm, 3m; Cost = 1EUR
E = from hypermarket - Hose - 4mm, 10m; Cost = 2.5EUR;
F = from aquarium shop - 2x "T" Converter, 8mm outside, 4mm inside; Cost = 2EUR
G = from aquarium shop - 2x aquarium stone; Cost = 4EUR;
H = from hypermarket - 2x necklace bracket; Cost = 0.5EUR; these are used for hoses and are optional;
I = from hypermarket - drain hose - 16mm, 1m; Cost = 2EUR; this is used for overall tank drain and is optional;
*

J to Q Components
(J) to (Q) hydroponic components listed:
J = from aquarium shop - small water pump; flow = 400 L/h; max jet height = 0.7m; power = 5W; model = Hailea HX-1500; Cost = 9EUR
K = from aquarium shop - aquarium air pump; flow = 3.2 L/min; pressure = 0.01mpa; power = 2W; model = Hailea ACO-9601; Cost = 10EUR
L = from hydroponics shop - 80x GroDAN rock wool, 2.5cm; Cost = 5EUR
M = from hydroponics shop - 2x "White Boston" lettuce seeds; Cost = 0.7EUR
N = from hydroponics shop - 1x "Lollo Rosa" lettuce seeds; Cost = 1.2EUR
O = from hydroponics shop - Hydroton, 10L bag; Cost = 7EUR
P = from hydroponics shop - Growth Technology - "Ionic Hydro Grow" nutrient, 1L; Cost = 7EUR
Q = from hydroponics shop - Aptus - Regulator (100ml) and Plant Care (100ml); Cost = 3EUR
There are other components that appear in later images:
R = Bison - Sanitary Silicone; Cost=3EUR
S = small propagation tank; Cost = 0 (any small tank);
You will also need: electrical drill machine, electric saw, duct tape.
Total Cost = 70.5EUR
Note: we will use further in the article the notations, from A to S, conform to their description above.
1.2 Building the system
Ensure you have the materials above. Of course, the quantities may vary, for example you don't need 10L of hydroton (1L is enough), and you may also get rid of optional components.
First, some tests are necessary - the ones regarding the water and air pumps - this to assure they work and they provide the necessary flows, like in the images below:

Connection between water pump and manifold
(connect C - D - J)
(connect C - D - J)

Water Pump Test without 4mm hoses connected on manifold outputs
(test C - D - J)
(test C - D - J)

Water Pump Test with 4mm hoses connected on manifold outputs
(test C - D - J - E)
(test C - D - J - E)

Air Pump Test with aquarium stones connected on 4mm hose
(test G - E - F - E - K)
Now, that we ensured these subsystems are working, we may continue to the next steps.
We'll continue with drilling the holes for the net pots on the water tank tray:

Establishing locations for the net pots (B) holes in the tray (A)
Note: make sure the net pots are located on the same height of the tray.

Setting the diameter for the drilling machine circular saw
Note: make sure the holes match the inner diameter of the net pots.
Next, we'll drill the location for the manifold with a linear electric saw:

Marking the manifold (C) location

Fixing the manifold (C) with sanitary silicone (R)
As my water tank was transparent, I have to darken it with some duct tape; this is required, as other unwanted plants (algae like) may develop in the water tank.

Darkening the bottom of the water tank
The final built system will look like:

Final hydroponic system
1.3 Sowing and Propagation Stage
I took an ordinary small transparent tank (S) for the propagation of seeds; I chosen to be transparent because I'm sowing lettuces, but be aware that other plants may require a dark propagation medium.
I also put the seeds in the small holes of the rock wool pieces. Thus, on one row I have "White Boston" seeds and on the other I have "Lollo Rosa":

Put seeds (M and N) on the rock wool (L) and placed in propagation tank (S)
Starting from the 3rd day, I put some Ionic Hydro Grow nutrient (P), according with Ionic Scheduler:

Ionic Hydro Grow (P), its scheduler and a syringe
Starting from the 3rd day, I put some Ionic Hydro Grow nutrient (P), according with Ionic Scheduler:

Ionic Hydro Grow (P), its scheduler and a syringe

Ionic Hydro Grow scheduler
After 4 days, they looked like:

Seedlings after 4 days
Then, after 7 days, they looked like:

Seedlings after 7 days
After 10 days, which was the time I decided to move the seedlings to the hydroponic system, they looked like:

Seedlings after 10 days
Note: usually the plants should be moved from the propagation system (S) to the Hydroponic system when the second level of leaves appear; this happens usually at 7-8 days after sowing.
1.4 Grow stage
To move the plants to the hydroponic system, I connected the water pump (J) inside the tank (A), then I connected the air pump (K) and the aquarium stones (G) to the tank, then put the net pots (B).
On the bottom of the net pots (B) I put a little hydroton balls (O), just to cover the bottom of the net pots; then I took the rock wool pieces (L) with plants and put inside the net pots over that hydroton; then I filled up the net pots (B) with hydroton (O) beside the rock wool pieces (L).
I started to fill the tank with water - the usable tank volume, until the water reaches the base of net pots, is about 30 liters (from 43L), but I only put 15 liters of water, then mixed with about 80ml nutrient solution (P).
It resulted the system in the image:

Hydroponic system

Hydroponic system

Closer look on the net pots.
Note: make sure that the manifold output hoses (E) water the rock wool pieces (L).
I will put further images with the system.
*
(: New pics :)
(... sorry for the delay, the harvesting was about a half of year ago ...)
 (about 7 days after put to Hydroponic system)
 (approx 6-8 days after put to Hydroponic system,
if I remember correctly...)
 (approx 6-8 days after put to Hydroponic system,
if I remember correctly...)
 (approx 14-16 days after put to Hydroponic system,
if I remember correctly...)
 (approx 14-16 days after put to Hydroponic system,
if I remember correctly...)
 (approx 14-16 days after put to Hydroponic system,
if I remember correctly...)
 (approx 25-28 days after put to Hydroponic system,
if I remember correctly...)
 (approx 25-28 days after put to Hydroponic system,
if I remember correctly...)
*
Unfortunately for the plants, at about 30 days after I moved them in the Hydroponic system,
I had to leave the town (holiday time), and when returned, the harvesting time passed for about 5 days, so many of lettuces became thirsty, as they remained in a horible July sun and without sufficient water... so...
I could harvest only a half of the crop.
*
As a conclusion: the system was good enough, but you have to take care to check the water level in the tank, also to check the nutrients level - ie. a PH-meter would be good.
*
(: New pics :)
(... sorry for the delay, the harvesting was about a half of year ago ...)


if I remember correctly...)

if I remember correctly...)

if I remember correctly...)

if I remember correctly...)

if I remember correctly...)

if I remember correctly...)

if I remember correctly...)
*
Unfortunately for the plants, at about 30 days after I moved them in the Hydroponic system,
I had to leave the town (holiday time), and when returned, the harvesting time passed for about 5 days, so many of lettuces became thirsty, as they remained in a horible July sun and without sufficient water... so...
I could harvest only a half of the crop.
*
As a conclusion: the system was good enough, but you have to take care to check the water level in the tank, also to check the nutrients level - ie. a PH-meter would be good.
*
This comment has been removed by a blog administrator.
ReplyDeleteThis comment has been removed by a blog administrator.
ReplyDeleteAt this time, I already harvested the letuces; I will post soon other images.
ReplyDeletesorry for the comments removed above... I had a strong feeling they contained commercials.
ReplyDeleteIt is very helpful tips for me. I defiantly use your tips in my work. Thank you for nice tips.
ReplyDeleteHydroponics
Come on, post the f** images man!
ReplyDeletesorry for the delay... will put the pics soon; anyhow, the last 2 weeks before harvesting were not so good because I had a holiday and had to leave the town... even if I put a person to take care of the plants, when I returned they were a little thirsty and I exceeded the harvesting time with about 5 days, so I missed about half of the crop :|
ReplyDeleteHaaa! I finally put the pics :)
ReplyDeleteHello, its very informative post, i like it. Thanks for sharing this wonderful post with us.
ReplyDelete